This document provides an overview on the steps necessary to install and to configure the CDM Data Portal.
Requirements
- mysql (v5.x+) or MariaDB (v10.1+) server
- http server: apache or nginx; in this guide we will only cover the configuration of apache 2 (v 2.4)
- php (7.x), php 8 will not work!
php
Install php with the following extensions (example for v7.4):
apt-get install php7.4 php7.4-mysql php7.4-gd php7.4-json php7.4-curl php7.4-xml
For running the CDM Data Portal it is required to assign sufficient memory to php. Please open your php.ini and increase the following parameter (memory_limit) in case it has a lower value. The php.ini responsible for the php processes executed in apache2 is found in Debian Linux and derivatives at /etc/php/7.x/apache2/php.ini.
;;;;;;;;;;;;;;;;;;;
; Resource Limits ;
;;;;;;;;;;;;;;;;;;;
memory_limit = 128M      ; Maximum amount of memory a script may consume (128MB)
Drush 8
Drush 8 are needed to automate several maintenance tasks. Drush versions newer than 8 are not compatible with Drupal 7 therefore it is required to install this version specifically. The official installation guide recommends the following steps for initial installation and upgrades:
# Browse to https://github.com/drush-ops/drush/releases and download the drush.phar attached to the latest 8.x release.

# Test your installation:
php drush.phar core-status

# Rename to `drush` instead of `php drush.phar`. Destination can be anywhere on $PATH.
chmod +x drush.phar
sudo mv drush.phar /usr/local/bin/drush

# Optional: Enrich the bash startup file with completion and aliases.
drush init
Apache 2
For testing purposes the CDM Dataportal Drupal 7 installation package provides configuration templates suitable for running a CDM Data Portal site locally at https://dataportal.test/ or http://dataportal.test/. You may use these config files as base for binding the Data Portal site to another URL with proper ssl certificates for the according host machine.
Git
For updating the CDM Dataportal Drupal 7 installation package it is recommended to use git. If you don't have it already it is good time to install it now:
sudo apt-get install git
1. Install the CDM Dataportal Drupal 7 installation package
Download the latest release from https://cybertaxonomy.eu/download/dataportal/stable/ to the location where you want to install the cdm-dataportal Drupal 7 project. We recommend installation of the package into /var/www. The actual Drupal 7 root folder will finally be /var/www/drupal-7-cdm-dataportal/web
cd /var/www
sudo wget https://cybertaxonomy.eu/download/dataportal/5.x.x/drupal-7-cdm-dataportal-5.x.x.tar.gz
This archive contains a shallow clone of the whole project together with a ready to use Drupal 7 installation with the cdm-dataportal module, zen_dataportal theme and other requirements. The drupal-7 installation is in the sub folder `./web`
Extract and adapt the owner ship of the `./web` sub folder:
sudo tar -xzf drupal-7-cdm-dataportal-5.x.x.tar.gz
sudo chown -R :www-data drupal-7-cdm-dataportal/web
You may now want to copy the apache 2 site configuration files from `scripts/apache2.4/` to `/etc/apache2/sites-available/` and to activate one of them, preferably the ssl site configuration:
sudo cp drupal-7-cdm-dataportal/scripts/apache2.4/dataportal.test* /etc/apache2/sites-available/
sudo a2ensite dataportal.test-ssl.conf
sudo systemctl reload apache2
Now you are prepared to install a CDM Data Portal Drupal 7 site. If you want to install a copy of an existing portal, please go to https://dev.e-taxonomy.eu/redmine/projects/edit/wiki/CdmDataportalSiteMigration
A template for the below script can be found in `scripts/user/`
Make an executable copy from `new-site.sh.template` as `new-site.sh`
sudo cp new-site.sh.template new-site.sh; sudo chmod u+x new-site.sh
Adapt the below shown variables in the script to match your desired setup:
################################################################
## Configure below variables

SITE_NAME='test-site'

# HOST_NAME and PROTOCOL determine the base URL of the new site
# The default values will form the base URL like http://dataportal.test
# See also MULTI_SITE below
HOST_NAME='dataportal.test'
PROTOCOL='https' # values 'http' ot https'
# For MULTI_SITE=0 the site will be installed at the base BASE_URL
# In multisite setups (MULTI_SITE=1), however, the site URL results
# in http://dataportal.test/test-site
# !! Mutisite support ist still experimental !!
MULTI_SITE=0 # values: 1 = true, 0 or other = false

ADMIN_USR='admin'
ADMIN_PWD='change--me'
ADMIN_EMAIL='admin@dataportal.test'

MYSQL_USR='root'
MYSQL_PWD='change--me'
DB_PREFIX='drupal7_dataportal_'
################################################################
And execute the script from within the folder `scripts/user/`, otherwise the `$DRUPAL_ROOT` variable will not match the `./web` folder !
Once the script has fished it will print out the final URL of the new site together with other useful information. In case of the example given above, the site will be installed running http://dataportal.test/test-site. This URL is only suitable for development purposes and local testing. In order to register the host name dataportal.test locally, you can, for example, add an entry to your /etc/hosts file:
127.0.0.1 dataportal.test
Problems? In some cases you may encounter a minor problem which is known to happen with Drupal an specific php versions. In this case the output on the command line contains multiple lines like:
ini_set(): Headers already sent. You cannot change the session module's ini settings at this time in [warning]
These can usually be ignored and your site will be installed correctly anyway.
2. Connect the Data Portal to the CDM Server
Now you should configure the data portal to connect a CDM Server. The Installation of the CDM Server component is described in https://cybertaxonomy.eu/cdmserver/installation.
You can get the URL to the server instance directly from the CDM Server management console by doing a right click on the link in the "Path" column. (see also CDM Server Installation | Configuration)
Please set this URL for "CDM web service URL" in the data portal configuration at Administration » Configuration » CDM Dataportal and click the "Save" button close to the bottom of the configuration page:

3. Modules & Themes activation for CDM Server
Now all necessary modules are activated as well as important settings have been configured.
The theme of the Drupal site is set to the theme called zen-dataportal which is is the default theme for CDM Data Portal installations, which brings a lot of improvements and fine tuning for CDM Data Portal sites. The according theme settings page "Administration » Appearance » Settings >> CDM DataPortal base theme" offers a couple of options to brand your site individually.
Please follow the instructions given on the welcome page to complete your setup, These steps are also desciren here:
- Log-in to your new DataPortal. The admin user name and password are those that you have configures above in the new-site.sh script.
- Connect your CDM Data Portal to a CDM Server: Go to "Home » Administration » Configuration » CDM Dataportal" and enter the CDM web service URL, scroll down, click save and choose a classification at Taxon Tree / Default classification in the same page, save the form again.
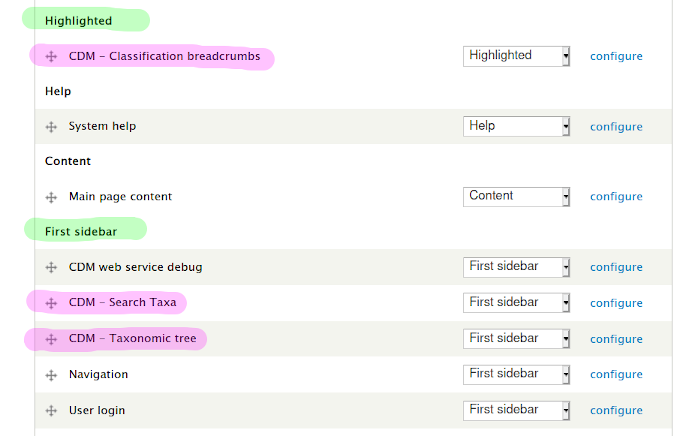
- The CDM Dataportal provides several Drupal Blocks which you may want to activate Navigate to the block settings (Administration » Structure) and activate the desired blocks:
- CDM - Search Taxa: Offers a search box to search for taxa. At the bottom of the block a links to an advanced search is offered. (best placed in region "First sidebar")
- CDM - Taxon Tree: A classification tree browser. This block also supports multiple concurrent classifications by providing a user interface element for switching the currently chosen taxonomic classification. The highest rank to be displayed can be configured in the General tab of CDM Data Portal settings (Administer > Site configuration > CDM Data Portal) (best placed in region "First sidebar")
- CDM - Classification breadcrumbs: This block provides another way to access the classification tree. In contrast to the CDM - Taxon Tree this widget displays the location of the currently selected taxon in a breadcrumb style menu. (best placed in region "Highlighted")
- External Taxon Links: The “External Links”- block is displayed for each taxon individually. The different links offered by this block element trigger search operations using the taxon name on the various connected central services. The result is displayed in a separate browser window. (best placed in region "First sidebar")
- or any other starting with CDM - ...
The Blocks administration form may look like shown below after you have completed the configuration:

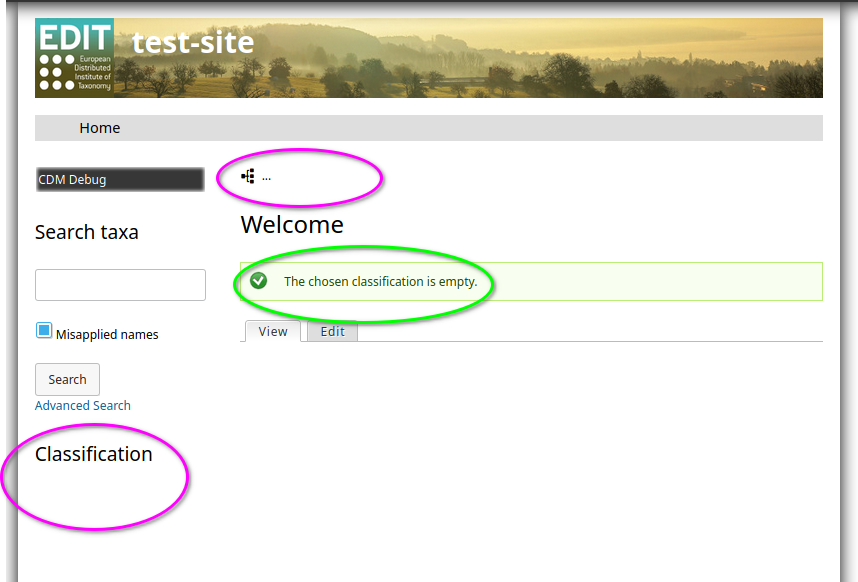
The front page should now look like shown in this screenshot:

You now can proceed directly to section "What's next?" (below), or you may want to configure the 'clean URLs' feature now.
4. Advanced configuration
Clean URLs
In addition to the usual tasks required for enabling clean URLs in Drupal ( http://drupal.org/getting-started/clean-urls ) you have to modify the .htaccess file and your Apache 2 virtual host configuration a bit. These steps are needed since the CDM Data Portal will do AJAX request in the background. Without the modifications described in the following these request URLs will be broken by the Apache URL rewriting:
- Add the following RewriteMap directive to the virtual host configuration or to the server config if you don't have any vhosts (in /etc/apache2/sites-available/)
RewriteMap escape int:escape
- Change the default Drupal RewriteRule by replacing $1 by ${escape:$1} in the .htaccess file located in the Drupal root folder, e.g.: /var/www/drupal-7-cdm-dataportal/web/.htaccess
RewriteRule ^(.*)$ index.php?q=${escape:$1} [L,QSA] - Now reload or restart Apache.
Individualization and finetuning of the Data Portal
Documentation on administering the Data Portal is still very preliminary and only available in a draft version, that consists of a mix of english and german paragraphs:
A better documentation will be coming soon ....
For a first stat we recommend reading of the following chapters:
- 1.1 Introduction
- 1.2.3 Site Name ändern (How to change the site name)
- 1.2.2 Including a banner
Multi site installation
If you are interested in more advanced setups like running multiple CDM Data Portal instances in one Drupal installation, you may want to visit the drupal official site or our developer installation guide or just contact us.
5. What's next?
Entering data
With the TaxEditor you enter data into your project database. To downlaod the TaxEditor and connect it to the cdm server which is configured in your data portal, pleaes follow the instructions on the Platform Documentation wiki page :
Where the following manual parts may be important for you.
- User manual part 1: TaxEditor installation and updates: Manual-EDIT-Platform-01-INSTALL.pdf
- User manual part 2: on using accessing the demo servers Manual-EDIT-Platform-02-DEMO.pdf
- User manual part 3: Introduction to the TaxEditor: Manual-EDIT-Platform-03-TaxEditor-Intro-v1.01.pdf
- User manual part 4: Using the TaxEditor: Manual-EDIT-Platform-v.1.19b.pdf
